FIDO and Flutter - passwordless sign in with passskeys


FIDO is the (relatively) new authentication framework that allows passwordless sign-in by using passkeys.
FIDO is an industry-standard that is supported by anyone that matters and right now is implemented in every browser and by every OS.
FIDO is going to change the world of authentication.
FIDO is here and in the near future users will expect your app to support it.
This is the first part of a multi-part series where we are going to look at the details of what FIDO is and how it works. As we progress through the series we are going to provide sample code that implements a FIDO Server (relay party), a FIDO Client and integrate FIDO into a Flutter app.
Why FIDO
FIDO has two key objectives, passwordless sign-in and phishing resistance. Passwordless sign-in is a core feature of FIDO, but to obtain the phishing resistance advantages, you need to implement 2FA with FIDO.
So why FIDO? FIDO is emerging as 'the' standard for authentication with support from every major vendor, it provides your users with a better authentication process (but does make registration a little more complicated) and protects users from a range of phishing attacks (when 2FA is implemented).
The great news is that as Flutter developers, we are (mostly) building mobile apps and a mobile device gives us access to the basic tools to implement two-factor authentication(2FA).
Why 2FA
Whilst two-factor authentication (2FA) is included in the FIDO protocol it is an optional component. Having said that, it's only a small piece of work to include 2FA and the benefits (and ease of use) that come with it make 2FA a must.
The factors in 2FA can be derived from a user ‘having’ something or ‘knowing’ something. In the case of a mobile phone the user ‘has’ a mobile device, ‘has’ biometric data (a fingerprint or face scan) or ‘knows’ a pin. Any two of these can be used to create the 2 factors required for 2FA.
This is what separates a mobile device from a (typical) desktop PC. A mobile has more factors available for us to use. With biometric data, a user of a Flutter app only needs to tap their finger on the fingerprint scanner or show their face in order to sign in.
No more passwords (sort of), almost instant sign-in and as mentioned above, resistance to common phishing attacks.
What more could you want?
Well, there are some caveats.
The basics of FIDO
Let’s talk about some of the basics before we dig into the details.
Note: the FIDO documentation refers to the concept of ‘bootstrapping an account’. I found this term rather unhelpful so instead I’m going to use the phrase ‘enrollment’ as I think it makes it clearer as to what is going on.
Each device that a user has (mobile, PC) needs to be enrolled. In turn, each account the user has needs to be enrolled. If you like, an ‘enrollment’ is required for each combination of device/account.
This probably means that your database model is going to need to change. Typically most of us will have an ‘account’ table where we store the username/password. With FIDO we will also need a ‘device’ table that stores the device id and public key (more later) for each device the user has enrolled from. For a NoSQL implementation, you will need to add a list of devices to your account document.
The enrolment requirements mean that a user with three devices and two accounts will need to enrol 6 times and you need to track all of these.
The magic of enrolling
So when we say a device/account needs to be enrolled, what exactly is going on and if we are no longer using a password then what black magic is replacing it?
In short, the user's password is replaced with a public/private key pair.
When a user enrols a device/account combination, the enrolment process generates a public/private key pair. The private key is securely stored on the user’s device and the public key is handed to your app server for storage (in the above-noted device table).
To ensure we are all on the same page, let’s do a quick revision on public/private keys.
Public/private keys are asymmetric keys.
With a simple symmetric key (e.g. AES256) I can encrypt then decrypt a piece of data using the same key. With asymmetric keys I encrypt with one of the keys but can only decrypt with the other key.
A test case for a symmetric key might look like this:
var key = generateKey();
var plainText = ‘hello world’;
var encryptedText = encrypt(plainText, key);
expect(plainText, equals(decrypt(encryptedText, key));
The same key is used to encrypt and decrypt.
With an asymmetric key pair, the test might look like this:
var keyPair = generateKeyPair();
var plainText = ‘hello world’;
// encrypt the text with the private key
var encryptedText = encrypt(plainText, keyPair.privateKey);
// decrypt the text with the public key
expect(plainText, equals(decrypt(encryptedText, keyPair.publicKey));
But swapping the keys also works:
var keyPair = generateKeyPair();
var plainText = ‘hello world’;
// encrypt the text with the public key
var encryptedText = encrypt(plainText, keyPair.publicKey);
// decrypt the text with the private key
expect(plainText, equals(decrypt(encryptedText, keyPair.privateKey));
At a high level, there is really no difference between the public and private keys except for the fact that the ‘private’ key must be stored securely. If the private key is leaked then your security is completely compromised.
On the other hand, the public key (as its name suggests) can be shared publicly in a very literal sense. It is entirely safe to share any public key on the internet in a way that anyone can access it. You don’t need to salt or encrypt a public key, just stick it somewhere that you can find it. In fact, in many instances, you actually need to publicly share your public key to get the advantages of it.
encrypting vs signing
If 'Bob' wants to securely share something with you, then Bob can (in theory) google your public key, encrypt the data and send it to you. To return data to 'bob' you don't use your private key, because anyone with your public key can decrypt your data. Instead, you find Bob's public key, encrypt the data with Bob's public key and then send it to him (the details are quite a bit more complicated but the concepts are correct). When Bob receives the data, he (and only he) can decrypt the data with his private key.
To send the data to Bob we do:
var keyBobPublic = getBobsPublicKey();
var plainText = ‘hello world’;
// encrypt the text with bob's public key
var encryptedText = encrypt(plainText, keyBobPublic);
sendToBob(encryptedText);
When Bob receives the encrypted data:
var encryptedText = receiveEncryptedText();
var keyBobPrivate = getBobsPrivateKey();

// decrypt the text with bob's private key
var decryptedText = decrypt(encryptedText, keyBobPrivate);
print(decryptedText);
Of course, when Bob receives the encrypted data he can't 'reliably' know who sent it to him.
This is where the concept of signing comes in.
When you send the encrypted data to Bob you can also add a signature to the data.
To create a signature we would typically take a hash of the data we are sending to Bob and then encrypt the hash with our private key (the data is encrypted with Bob's public key, the hash with our private key). The encrypted hash is referred to as a signature.
To send the data to Bob with a signature:
var keyBobPublic = getBobsPublicKey();
var plainText = ‘hello world’;
// encrypt the text with bob's public key
var encryptedText = encrypt(plainText, keyBobPublic);

var hash = calcHash(plainText);
var myPrivateKey = getMyPrivateKey();
// encrypt the hash with my private key
var signature = encrypt(hash, myPrivateKey);

sendToBob(encryptedText, signature);
When Bob gets the encrypted data and the signature he decrypts the data with his private key, takes a hash of the data, then decrypts the signature using our public key. If the decrypted hash matches the hash Bob calculated, then Bob 'knows' that we sent him the data.
var (encryptedText, signature) = receiveEncryptedText();
var keyBobPrivate = getBobsPrivateKey();

// decrypt the text with bob's private key
var decryptedText = decrypt(encryptedText, keyBobPrivate);
var hash = calcHash(decryptedText);

var myPublicKey = getMyPublicKey();
var remoteHash = decrypt(signature, myPublicKey);

if (remoteHash == hash) {
   print('We know we got data from Brett');
}

print(decryptedText);
Now there is still a problem here, if we just found Bob's public key on the internet, how do we know it's Bob's public key and not someone pretending to be Bob. This is the problem that registration needs to solve and that is next week's problem.
Back to FIDO
So with FIDO enrolment, the private key is stored on the user's device and we store the public key on our server.
Challenging times
So when we talk about a user ‘having’ a device (with respect to 2FA), what we really mean is that they have access to the ‘private key’ that was used when the device was enrolled with our app server. This highlights the need for the private key to be kept secure. Having the private key is the same as ‘having’ the device. Fortunately, the OS manages the private key for us and in fact, we never get (nor need) access to it.
So we now understand public/private keys but how does the login process work and use our key pair?
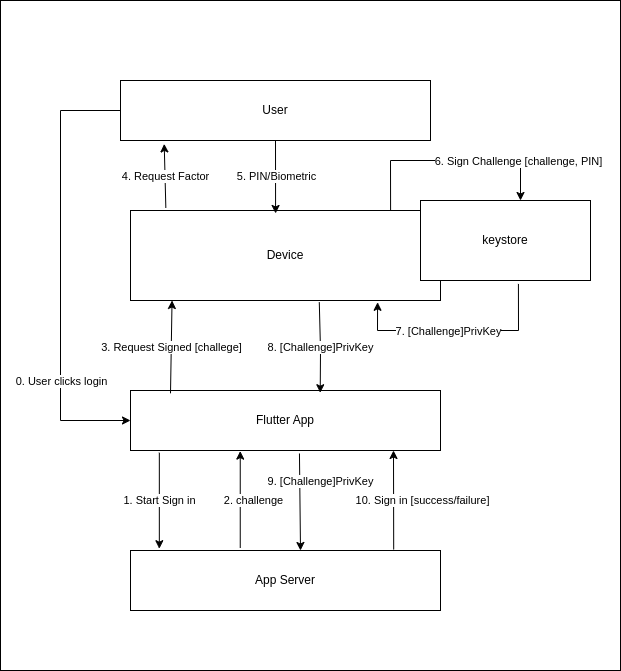
The user triggers a sign-in process by clicking the Flutter App’s login button
The Flutter app sends a request to the app server to commence a sign in
The server responds with a ‘challenge’ which is just a randomly generated string.
The Flutter App requests a FIDO sign-in from the device, passing the challenge
The device requests the user to authorise the sign-in request
The user enters their PIN or responds with biometric data (fingerprint or face)
The device unlocks the keystore using the PIN and asks it to ‘sign’ the challenge.
The keystore returns the signed challenge to the device
The device returns the signed challenge to our Flutter app
The Flutter app passes the signed challenge to our app server. The app server validates the signature by decrypting the challenge with the user’s public key. If it matches the original challenge then we know the user is valid
the app server returns success if the user is validated.
So that was easy :<
From our perspective the process is non-trivial but from the user's perspective, all they had to do was click ‘login’ and then tap the fingerprint scanner. We have now logged the user into our app and hardened them from phishing attacks. There is no password to be divulged and any attacker still needs 2 factors to login to the user’s account even if they did trick them into entering their PIN into a fake site.
What's next
In the next article in this series, we are going to look at how a user registers using FIDO and what that means about our existing registration process (spoiler: we still need it).
I’m currently working through implementing a Dart-based FIDO server, FIDO client and example app based on the work of:
https://github.com/mojaloop/contrib-fido2-flutter-lib https://github.com/shafiqaiman96/contrib-fido2-flutter-lib
If you are interested in my work (or want to contribute) on a FIDO server/client then you can follow along at:
https://github.com/onepub-dev/fido-server
https://github.com/onepub-dev/fido-client
My fork of the contrib-fido2-flutter-lib is at: